I like working with wire and gemstones and needless to say I like wrapping wires around gemstones. I made earrings like this a few years ago using pearls and to this day I still have them and get a lot of compliments whenever I wear them.

These earrings are super easy to make and the materials are fairly simple:
1 strand of round gemstone beads (between 2mm to 4mm)
10" - 12" sterling silver wire - 26 gauge to 28 gauge, I prefer to use 26 gauge
2 large hole sterling silver beads (2mm -4mm)
2 sterling silver hooks
Tools:
flat nose pliers
round nose pliers
flush cutter
The final size of the earrings is determined by the size of the gemstone beads. Also, I listed round beads because they give the most symmetrical shapes when wire-wrapped.
In addition to my round gemstones I made earrings using rice-shaped fresh water pearls and while the result is still lovely, the earrings were a bit more challenging to make because the size of each individual pearl has to be "matched" to ensure that the wire-wrapped shape maintains a uniform look throughout the piece.
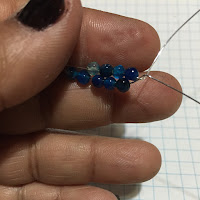
I like to start in the middle and wrap my way out of each piece. The hardest part is getting the middle started and the rest is as they say a piece of cake! Just so you know the wire wrap loops are made up of the following number of beads: 5/7/5/9/5/7/5 or they can be other number of combinations as long as the "inner" beads are smaller quantities than the "outer" ones.
To start, place the beads in the middle of each wire, 5 in outer loop and 4 in inner loop, find the approximate center and hold the wires in place while twisting one end. Curve the wires and close the loop by twisting the other end.


Continue adding beads to make the next loop: 3 beads in the inner loop and 4 beads in the outer loop. Twist the wire ends to complete each loop.
 As you go twisting the wire to finish each loop, ensure that the twists of the wire remain the same on either side in order to give the earrings a symmetric look.
The last loop has 2 beads in the inner loop and 3 in the outer loop.


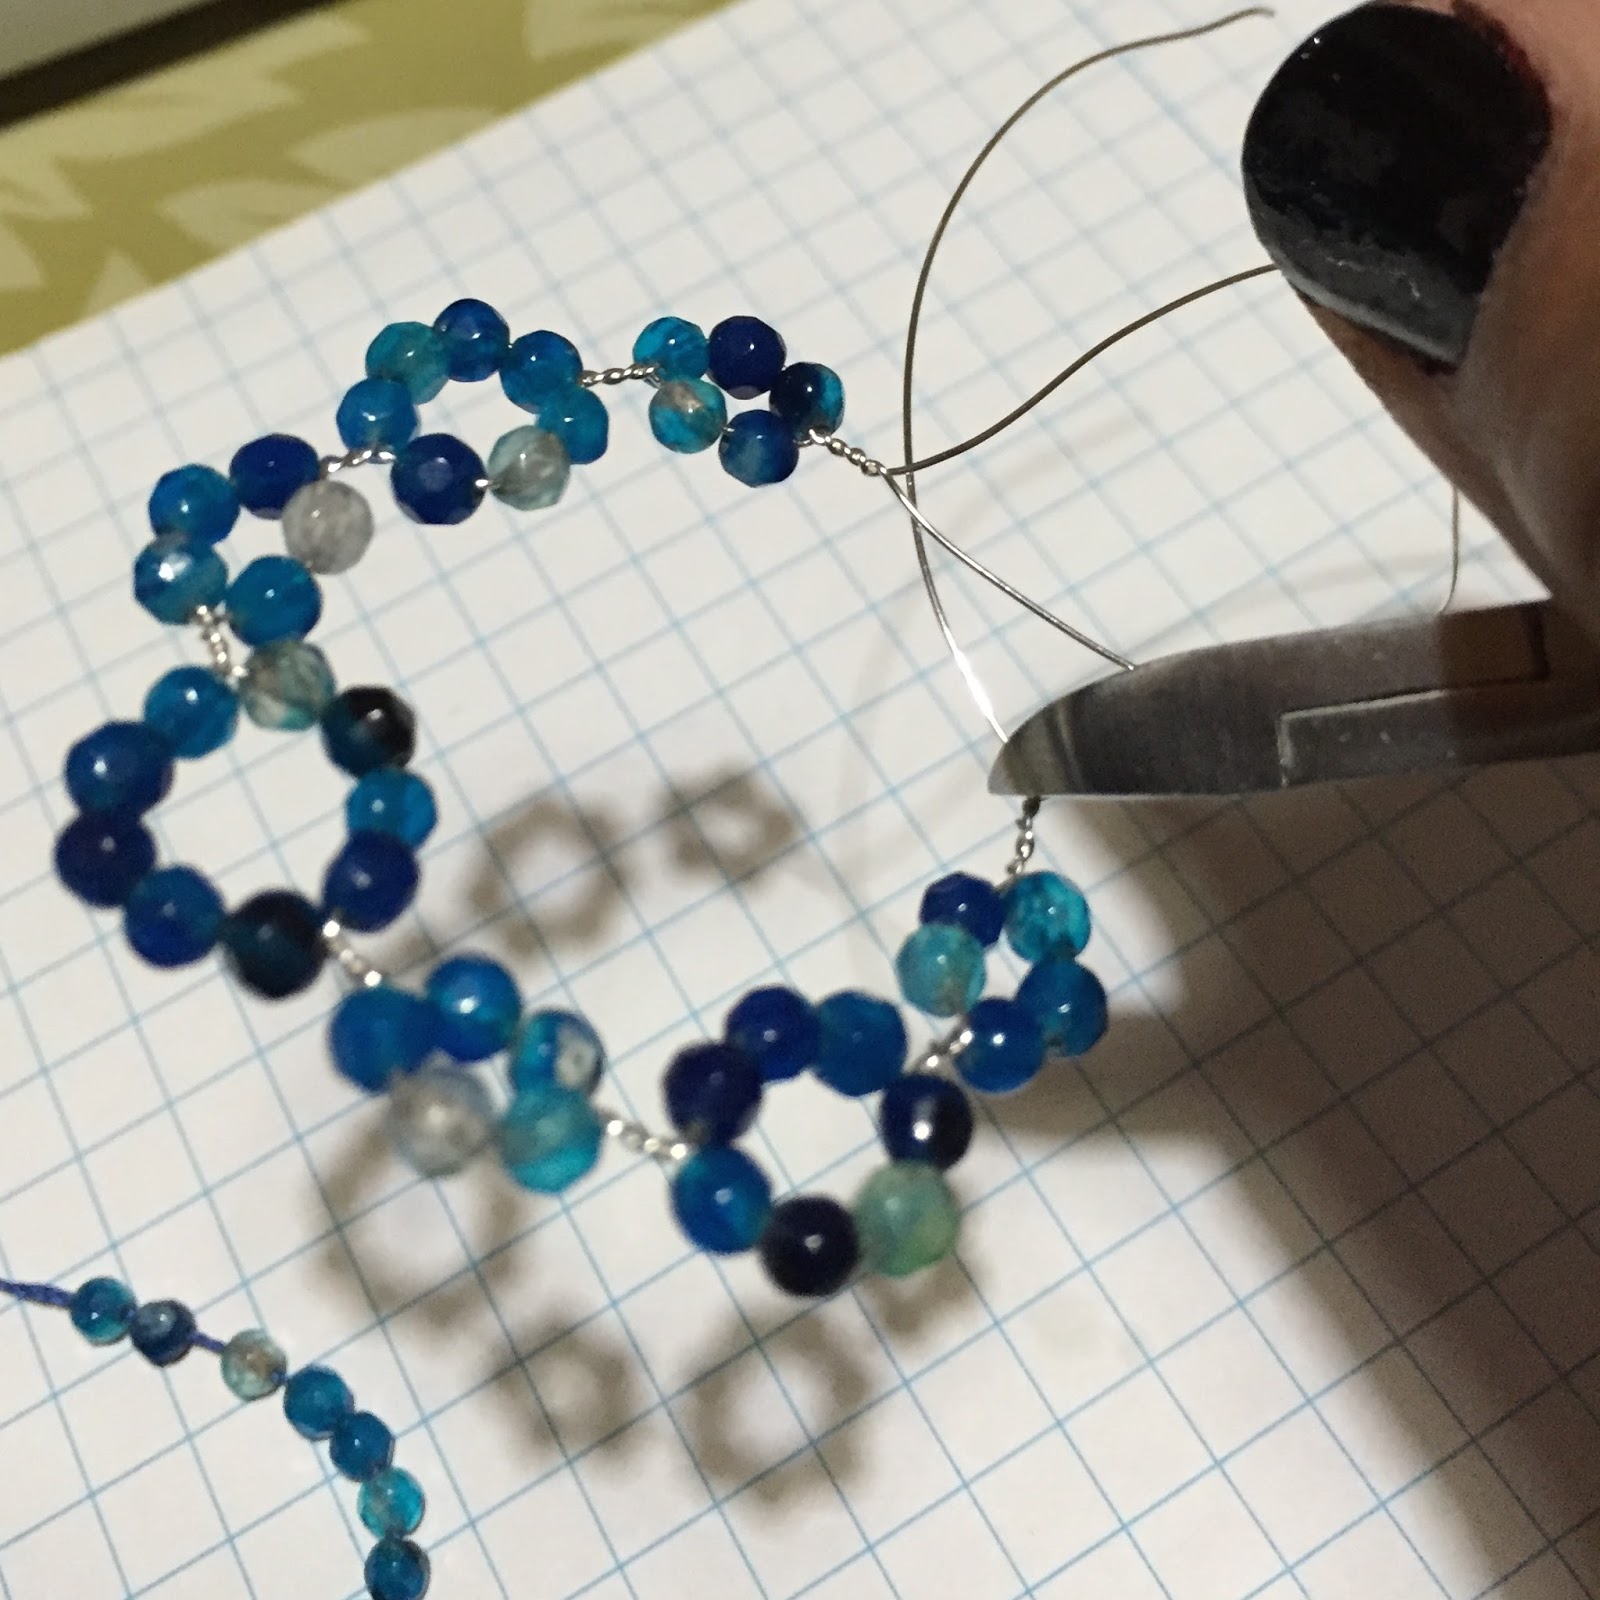
After the wire is twisted 3-4 times, cut one wire from each end so the remaining wires can be twisted. The twisted wire should be thin enough to be able to thread a round metal bead. The hole of the metal bead must be big enough to let the wire through.


Twist the remainder 2 wires together leaving about 1 1/2" to 2" of twisted wire.


Finish the earring with a loop that will allow to secure the ear hook to complete the earrings.


I hope you've enjoyed this tutorial and if you have any questions, feel free to ask away. As always, the more you practice, the better the end results. This las photo includes the earrings I made with rice shaped fresh water pearls, round black onyx, and faceted blue agate rounds.

These 3 pairs are my follower appreciation gifts as I've reached 300 followers in Instagram. If you are interested in joining in the fun please visit my Instagram account (@marirudesign) for more information or copy the following link on your browser: https://www.instagram.com/p/BEb9mZ-ssHd/?taken-by=marirudesign
Remember that Life is Good in Sunny Puerto Rico!

These earrings are super easy to make and the materials are fairly simple:
1 strand of round gemstone beads (between 2mm to 4mm)
10" - 12" sterling silver wire - 26 gauge to 28 gauge, I prefer to use 26 gauge
2 large hole sterling silver beads (2mm -4mm)
2 sterling silver hooks
Tools:
flat nose pliers
round nose pliers
flush cutter
The final size of the earrings is determined by the size of the gemstone beads. Also, I listed round beads because they give the most symmetrical shapes when wire-wrapped.
In addition to my round gemstones I made earrings using rice-shaped fresh water pearls and while the result is still lovely, the earrings were a bit more challenging to make because the size of each individual pearl has to be "matched" to ensure that the wire-wrapped shape maintains a uniform look throughout the piece.
I like to start in the middle and wrap my way out of each piece. The hardest part is getting the middle started and the rest is as they say a piece of cake! Just so you know the wire wrap loops are made up of the following number of beads: 5/7/5/9/5/7/5 or they can be other number of combinations as long as the "inner" beads are smaller quantities than the "outer" ones.
To start, place the beads in the middle of each wire, 5 in outer loop and 4 in inner loop, find the approximate center and hold the wires in place while twisting one end. Curve the wires and close the loop by twisting the other end.


Next, place 2 beads in the inner loop and 3 beads in the outer loop, curve wire and close the loop by twisting the wire. Then, repeat the process for the other end.


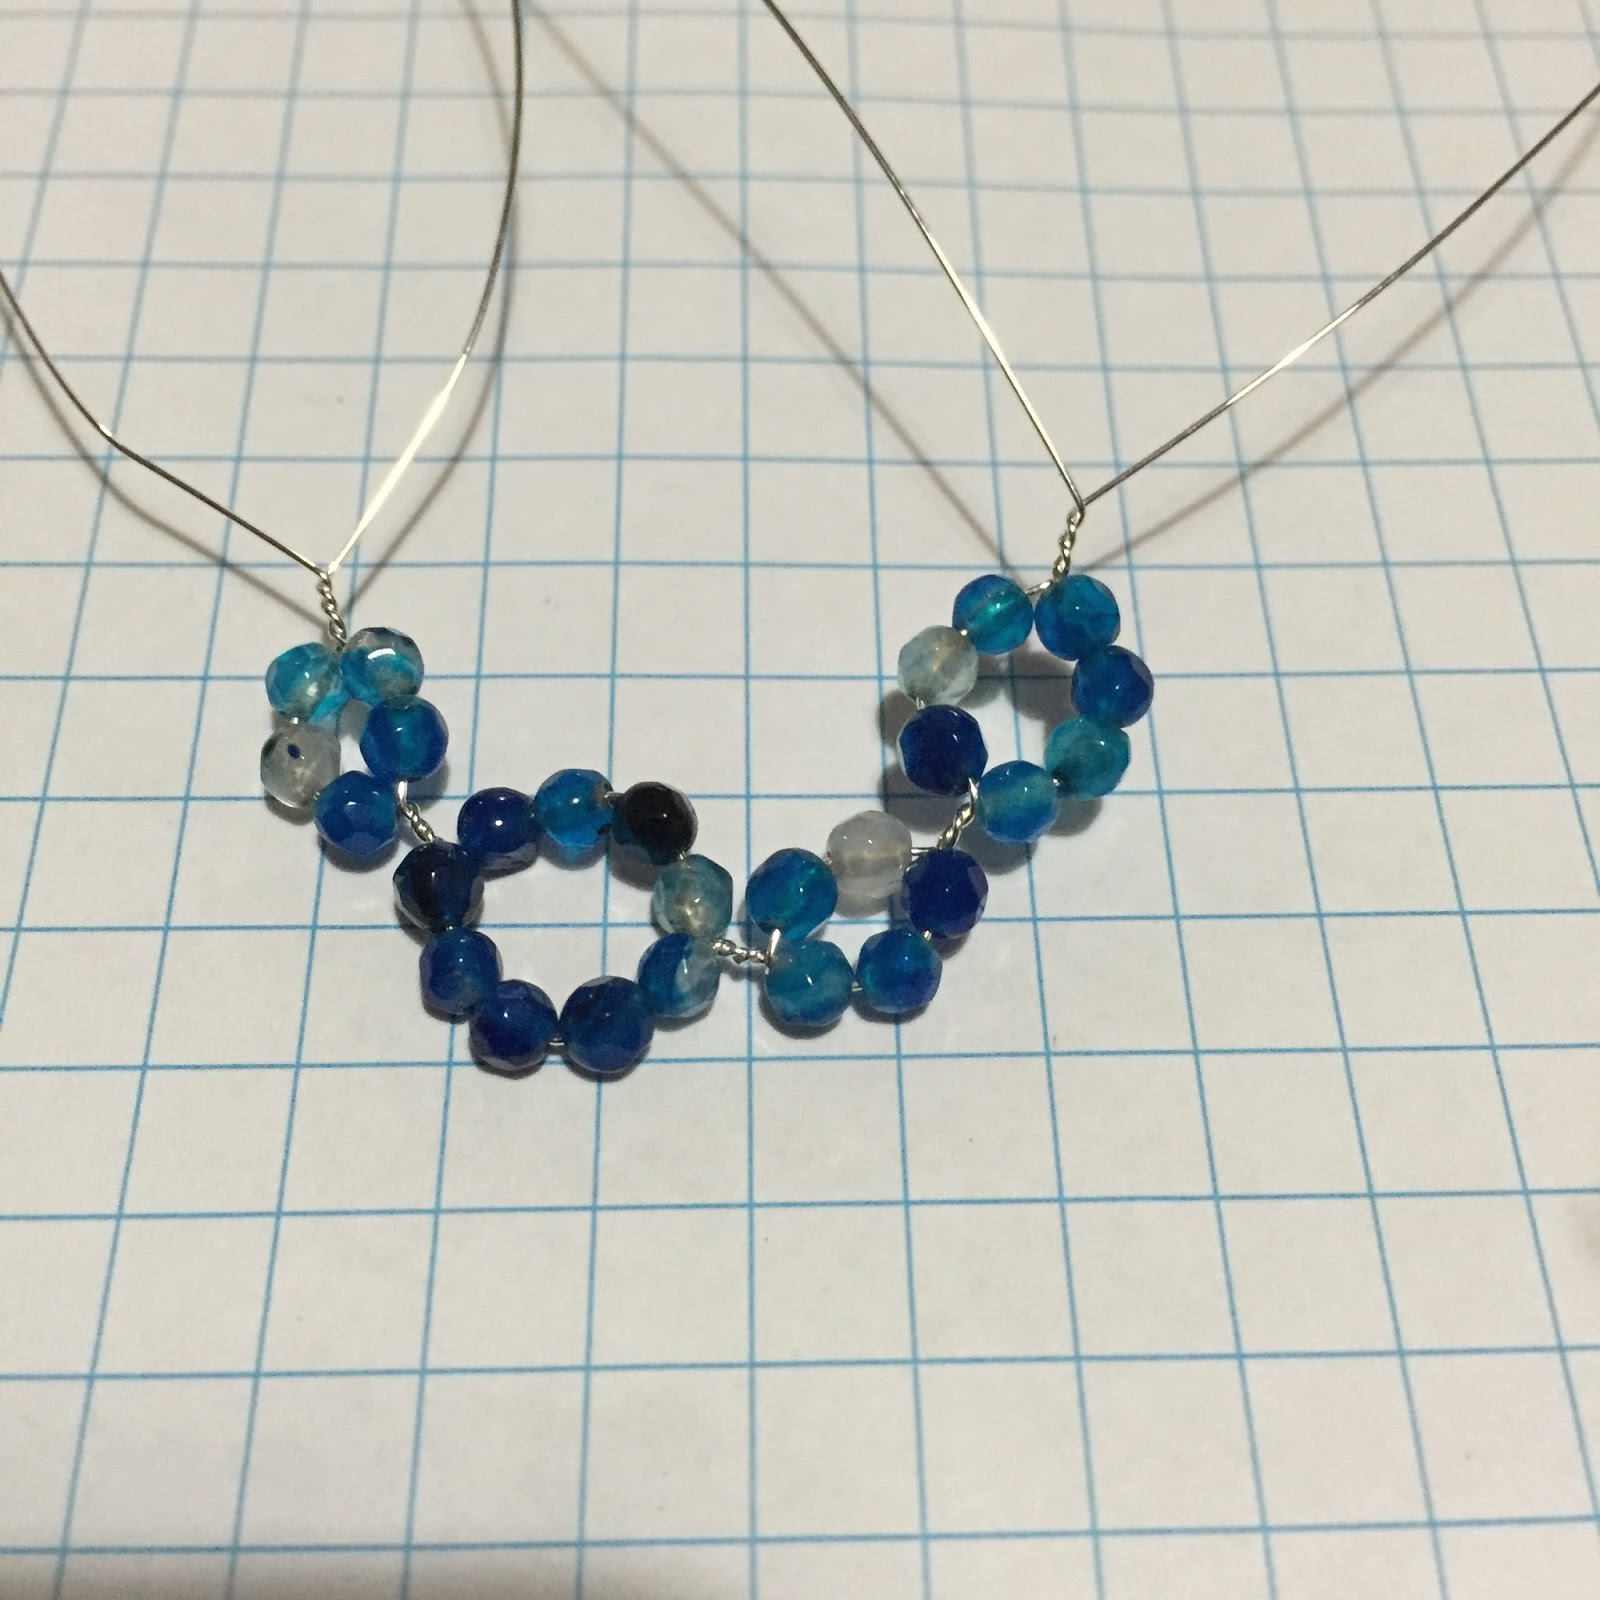
The last loop has 2 beads in the inner loop and 3 in the outer loop.


After the wire is twisted 3-4 times, cut one wire from each end so the remaining wires can be twisted. The twisted wire should be thin enough to be able to thread a round metal bead. The hole of the metal bead must be big enough to let the wire through.

Twist the remainder 2 wires together leaving about 1 1/2" to 2" of twisted wire.


Finish the earring with a loop that will allow to secure the ear hook to complete the earrings.


I hope you've enjoyed this tutorial and if you have any questions, feel free to ask away. As always, the more you practice, the better the end results. This las photo includes the earrings I made with rice shaped fresh water pearls, round black onyx, and faceted blue agate rounds.

Remember that Life is Good in Sunny Puerto Rico!
Thanks for suggesting good list. I appreciate your work this is really helpful for everyone. Get more information at created gemstones. Keep posting such useful information.
ReplyDeleteCasino Near Atlanta - MapYRO
ReplyDeleteFind all the Casinos Near Atlanta, 성남 출장샵 Georgia (MapYRO) with a map. Hotel and Casino. 광주 출장샵 2. Hotel and 광주 출장안마 Casino Ave, A casino-resort hotel 과천 출장마사지 near I-95 Exit 99A 전라북도 출장샵 and 3